

Views: 0 Author: Site Editor Publish Time: 2026-06-30 Origin: Site
The persistent debate over cutting materials before or after laminating continues to divide production floors everywhere. Securing a waterproof sealed edge competes directly against the sheer speed of full-sheet lamination. Operators constantly struggle to balance these two conflicting operational priorities during daily runs. This choice deeply affects product durability, labor efficiency, and overall material waste. Choosing the wrong processing sequence often leads to peeling edges. Conversely, doing it right manually might mean double the physical trimming work. Substandard workflow processes ruin entire batches and drain valuable labor hours unnecessarily.
We will explore exactly which materials demand pre-cutting and which substrates survive a post-lamination flush cut safely. You will learn how modern automation ultimately bridges the massive gap between processing speed and lasting encapsulation. We outline actionable steps to upgrade your daily operational workflow efficiently. Proper planning eliminates waste and ensures your finished products withstand their intended environments.
Porous, thick, or heavy-handling materials require pre-cutting to achieve a true encapsulated waterproof edge.
Standard printer paper and short-term deliverables can safely be laminated full-sheet and cut afterward (flush cut) without immediate delamination risks.
Manual pre-cutting doubles labor time, making it the primary driver of production bottlenecks.
Upgrading to an automated Laminating Cutting Machine eliminates the manual "cut-twice" penalty by integrating encapsulation and slitting into a single workflow.
Encapsulation happens when lamination film extends past the core material and binds directly to itself. Pre-cutting your substrates allows the machine to leave a clear 1/8-inch to 1/4-inch lip of pure plastic. This border protects the inner core from sudden moisture ingress. It also prevents physical peeling during rough daily handling. Creating this sealed edge represents the gold standard for long-term item preservation. You lock the internal paper fibers safely away from external environmental threats.
A flush cut behaves entirely differently. Cutting the item after laminating slices through both the protective film and the core simultaneously. This action exposes the core material's raw edge to the outside world. Moisture can easily wick into this exposed paper fiber over time. Oxygen and physical friction also attack the delicate boundary layer between the plastic and the print. We see rapid deterioration when operators mistakenly flush-cut substrates requiring full sealing.
Several underlying risk factors dictate how quickly delamination occurs on unsealed edges. Operators must evaluate these variables before deciding on a production sequence.
Film Thickness: Thicker films exert stronger physical tension. They often pull away from flush-cut edges faster than thin films.
Core Material Porosity: Porous paper absorbs liquid adhesive deeply. Glossy or coated stocks reject adhesive penetration, weakening the final bond.
Roller Heat Inconsistency: Cold spots on laminating rollers leave weak bonding zones. These weak areas split open rapidly when sliced by a blade.
Adhesive Chemistry: High-tack digital adhesives grip toner aggressively. Standard thermal adhesives struggle to maintain a flush edge over heavy ink coverage.
Heavyweight cardstock and thick chipboard consistently fail when post-cut. Thick materials create a physical "step" during the lamination process. Rollers struggle to bend the film tightly around this steep vertical drop-off. The plastic often bridges the gap, leaving microscopic air pockets along the border. If you cut these thick substrates flush, they split open almost immediately. The rigid paper fights against the plastic film tension constantly. Pre-cutting allows the film to seal flat against itself, completely neutralizing this tension.
Reusable school materials and interactive flashcards face harsh daily abuse. Children bend, twist, and drop these items repeatedly. Board game components also require a highly durable sealed plastic lip. This clear border helps them survive heavy handling and constant sanitization. Frequent wiping forces liquid cleaners into unsealed paper edges rapidly. A fully encapsulated border repels liquids and prevents the paper core from expanding or molding. You must pre-cut high-touch items to guarantee their survival.
Outdoor displays face rain, fluctuating humidity, and aggressive temperature swings. You absolutely must fully encapsulate these specific items. A sealed border prevents morning dew or heavy rain from wicking into the paper core. Once water enters a flush-cut edge, the entire sign warps and degrades irreparably. The internal inks will bleed outward, ruining the visual message entirely. Outdoor durability relies entirely on an unbroken plastic perimeter.
Modern digital presses lay down incredibly dense toner layers on printed sheets. Heavy ink acts as a literal chemical barrier to thermal lamination adhesive. The melted plastic struggles to grip the highly saturated paper fibers beneath the ink. Flush cuts on dark prints become highly susceptible to immediate edge peeling. The adhesive simply cannot anchor itself securely. Pre-cutting leaves a clear plastic border where the film bonds flawlessly to itself, entirely bypassing the ink barrier issue.
Standard office paper behaves very cooperatively under heated laminating rollers. Thin, porous paper allows liquid thermal adhesive to penetrate deeply into the loose cellulose fibers. This deep physical bond makes flush cuts highly stable for basic daily usage. General office documents handle post-cutting exceptionally well. You rarely experience spontaneous peeling when trimming 20lb or 24lb paper flush. The lack of material thickness prevents the aggressive "step" effect from forming.
Trade show flyers and temporary event displays rarely need decades of durability. Short-term indoor signage safely avoids harsh environmental stress entirely. You simply do not require the extreme longevity of a sealed edge here. Flush cutting saves immense production time for these short-lived marketing assets. Operators can feed massive full sheets into the laminator rapidly. They then slice the finished posters down to size in seconds. The operational speed easily outweighs the negligible risk of edge wear.
Premium business cards and high-end restaurant menus often demand perfectly clean edges. A visible plastic lip looks visually undesirable in these specific premium settings. Operators utilize specialized single-sided lamination to achieve this sleek aesthetic. High-tack digital films also grip flush edges much better today than older thermal plastics. We frequently see operators safely post-cut these items using heavy-duty guillotines. The clean, sharp edge projects professionalism while offering adequate surface protection.
Material Type | Recommended Sequence | Primary Reason | Expected Lifespan |
|---|---|---|---|
Heavy Cardstock | Pre-Cut (Seal) | Prevents splitting from thickness tension | Long-term |
Educational Flashcards | Pre-Cut (Seal) | Withstands heavy handling and sanitization | Long-term |
Outdoor Signage | Pre-Cut (Seal) | Blocks moisture and rain wicking | Medium to Long-term |
Standard Office Paper | Post-Cut (Flush) | Deep adhesive penetration prevents peeling | Short to Medium-term |
Business Cards | Post-Cut (Flush) | Aesthetic requirements dictate a clean edge | Short-term |
Processing items twice destroys your daily operational efficiency. You spend countless hours manually trimming raw printed sheets down to size. You then feed those loose pieces into a pouch laminator carefully. Finally, you hand-trim the plastic borders again to ensure uniform margins. This redundant cycle drains massive amounts of valuable labor time. Production floors relying on manual scissors or basic trimmers face severe output bottlenecks. Growth remains impossible when your team spends half their day cutting the exact same materials twice.
Manual border trimming always carries a staggeringly high margin of human error. Operators frequently misalign scissors or tabletop guillotines when rushing through large batches. Uneven edge margins ruin perfectly good prints instantly. A flashcard with a lopsided border looks highly unprofessional and often fails quality control. We see significant material waste percentages in purely manual workflow setups. Every ruined print wastes expensive ink, premium paper, and lamination film simultaneously.
Manual production workarounds eventually become entirely unsustainable. Schools, bustling print shops, and dedicated manufacturers reach a critical tipping point quickly. High weekly sheet volumes demand a far better operational approach. The continuous expense of manual labor hours simply outpaces the viability of hand-cutting twice. Operations managers must recognize when manual trimming shifts from a minor inconvenience to a major operational liability. Scaling your output requires abandoning outdated double-handling methods entirely.
Consider the typical steps involved in a highly inefficient manual workflow:
Printing full sheets containing multiple smaller designs.
Manually cutting the full sheets into individual raw paper assets.
Carefully aligning the loose paper pieces inside lamination pouches.
Feeding the pouches slowly through a tabletop thermal laminator.
Manually trimming the sealed plastic borders to achieve uniform edges.
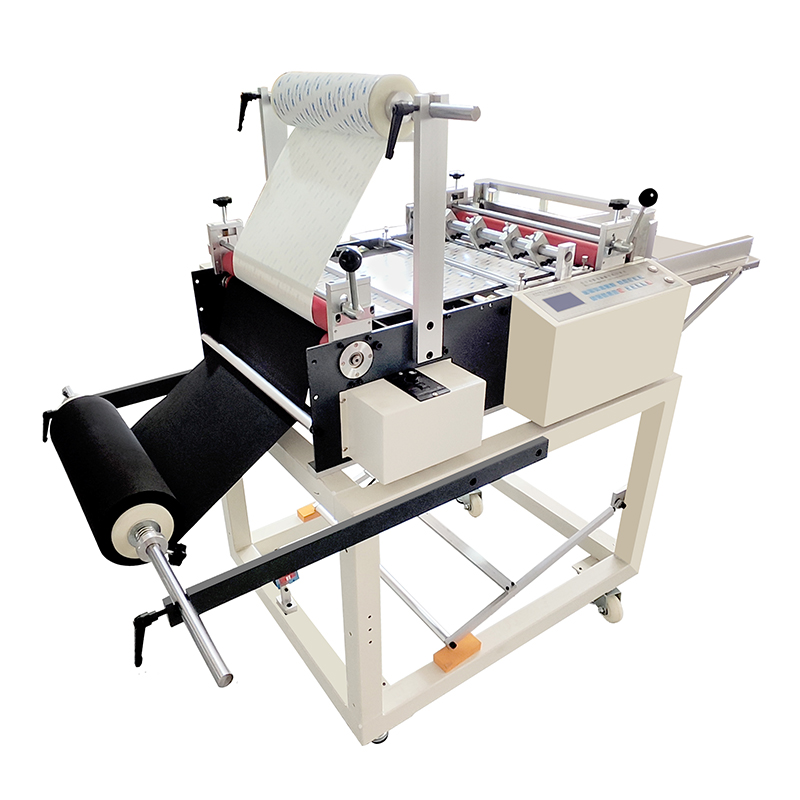
A modern commercial Laminating Cutting Machine transforms the entire production process instantly. It handles high-speed roll-fed lamination and precise automated trimming simultaneously. You accomplish both crucial steps in one continuous single pass. This equipment bridges the historical gap between rapid processing speed and lasting edge durability seamlessly. Operators simply load the printed web and let the automated system handle the encapsulation and final sizing. Output volume scales dramatically without adding any extra labor hours.
Many production facilities produce multiple smaller assets from continuous wide webs. You might print dozens of loyalty cards or luggage tags on a single roll. An automated Laminating Cutting Slitting Machine provides the ultimate reliable solution here. It automatically creates consistent, mathematically perfect margins between every single item. You eliminate manual slitting labor entirely while guaranteeing perfectly uniform borders. These inline slitting modules handle complex grid layouts effortlessly, dropping finished, fully sealed assets directly into the collection tray.
Industrial heated rollers outclass basic tabletop units easily in every measurable category. They provide dramatically better adhesive penetration into challenging printed substrates. Higher pneumatic pressure literally forces the melted film into microscopic paper pores. This commercial-grade physical bonding reduces delamination risk substantially, even on specific flush cuts. The consistent heat distribution across wide cylinders eliminates cold spots entirely. You achieve a flawless, bubble-free finish that manual pouch laminators simply cannot replicate.
You must match equipment specifications directly to your exact operational substrates. Different core materials require highly specific roller pressures to bond correctly. Film micron capacity matters immensely when processing thick vinyl or heavy synthetic sheets. Always run physical material tests on the equipment before committing to a new workflow. Thin paper requires very different tension settings than rigid cardboard. Understanding your exact material mix helps tailor the machine configuration precisely to your daily needs.
Floor space remains a highly premium asset in most busy production environments. You must weigh inline versus offline setups carefully. Inline systems connect physically directly to your digital printing presses. They offer incredible continuous automation but require massive uninterrupted floor space. Offline solutions offer better flexibility for environments running multiple separate print engines. You can easily shuttle printed rolls from various presses to one central offline finishing station.
Shortlisting commercial equipment requires deeply reviewing key automation tools. Look closely for optical mark recognition sensors ensuring highly accurate blade drops. Automatic margin adjustments save operators hours of tedious manual calibration. Robust tension control systems prevent the plastic web from wandering sideways during long runs. Integrated waste matrix removal mechanisms keep the entire production line running smoothly. These specific features determine whether a machine truly automates your process or just shifts the bottleneck elsewhere.
Equipment reliability hinges almost entirely on strong post-installation backing. You need a customized laminating and cutting solution backed by highly accessible expert technicians. Rapid technical support keeps unexpected downtime strictly minimized. Predictable machine maintenance schedules ensure your vital investment operates flawlessly for years. Never underestimate the immense value of readily available replacement slitting blades and heating elements. Strong vendor relationships guarantee your production floor never stalls waiting for simple consumable parts.
Audit your current weekly labor hours dedicated solely to hand-trimming plastics.
Measure your typical scrap rates caused directly by manual alignment errors.
Test your heaviest ink-coverage prints through automated rollers to verify edge sealing.
Train multiple operators on the new automated tension controls to prevent single-point failures.
The core material strictly dictates your necessary cutting sequence. Thick cardstock, high-touch educational tools, and outdoor displays demand true encapsulation achieved only through pre-cutting. Conversely, thin office paper and temporary indoor items survive post-cutting flush cuts exceptionally well. Understanding these material behaviors prevents massive batch failures and embarrassing product degradation. You can confidently optimize your finishing methods once you classify your printed assets accurately.
Stop accepting the massive labor penalties associated with manual double-handling. We strongly advise operations managers to audit their current weekly hours spent on hand-trimming borders. Calculate the raw material waste generated by human alignment errors. These hidden inefficiencies silently drain your output capacity daily. Upgrading to fully automated roll-to-sheet finishing equipment eliminates these bottlenecks entirely. Transitioning your workflow today secures superior product durability while freeing your team to focus on actual production growth.
A: Not necessarily. It heavily depends on material thickness and adhesive quality. Thin paper absorbs adhesive well and usually survives flush cuts. However, flush cutting entirely removes the waterproof plastic lip. This leaves the item vulnerable to moisture and heavy physical wear.
A: The industry standard margin typically ranges from 1/8 inch to 1/4 inch. This specific width provides a robust waterproof seal without appearing overly bulky. Modern automated cutting equipment easily programs and maintains this exact border consistently.
A: Yes. Commercial units featuring adjustable pneumatic roller pressure and robust slitting blades handle rigid substrates effortlessly. They are specifically engineered to process thick materials without jamming or dropping the web tension.
A: You must ensure proper temperature settings and allow adequate cooling time before the blade drops. Using specialized automated slitting blades designed to shed adhesive buildup also prevents sticky residue from ruining your clean edges.
